Including the "Why" Piece in Your Lessons

What if I told you there is an easy way to increase student engagement in your lessons without a fancy song and dance? There is! Students need to know WHY they are learning the material and how it relates to their lives.

Many teachers begin a lesson by sharing the daily plan and objective. For example, the daily plan might be “Take notes on the scientific method and complete the Steps of the Scientific Method Activity.” The objective might be “Students will be able to list the steps of the scientific method in order and identify each step in an experiment.” Before diving into the meat of the lesson, teachers should share one more thing: why students need to know this. When students know why they are learning something and understand how the content actually matters in their lives, they become much more invested in the lesson and retain more information.

For the why piece of the scientific method lesson I might say something like “The scientific method is a way of looking at problems and finding solutions. It’s a way of thinking. Being able to think scientifically will help you solve your own real life problems. It will also help you conduct experiments in this class and in your future science classes.”

Explaining the why should not look like “The steps of the scientific method will be on your unit test.” While, yes, that does explain a reason why students should know something, it is not a meaningful reason for their lives. They have no reason to be interested in the lesson because they don’t know why it matters in their lives. They have no reason to retain the information after the test.

Sometimes it is very easy to come up with a reason why students should know something. Why should students know about lab safety? Well, durrrr so they don’t get hurt. Why should students know about the metric system? They should know the metric system because if they do any kind of traveling outside of the country they’ll need it for something as basic as driving the right speed or knowing to pack warm clothes when they look at the temperature in Celsius.

Unfortunately, it can be difficult to come up with a reason for learning some of the required material students have to learn (which is a whole other topic of conversation). For material like that, I bring in their distant future goals. At the beginning of the year, I have my students complete goal posters about what they want to be in the future and how science can help them reach their goals. (Get the goal posters for free here.)

Some students have goals that relate directly to science—I want to be a veterinarian. Those are always easy to bring in the why of each lesson. They need to know biology for how the body works. They need to know chemistry so they can administer medicine safely and effectively to animals.

Other students have goals that aren’t directly related to science—“I want to be a professional football player.” For those students, science is important so they know biology to keep their bodies healthy during training and prevent injuries. They need to know chemistry so they understand the dangers of performance-enhancing drugs that could potentially be available. Also, before sports stars get acknowledged by a professional team they have to play on a team in high school or college. In order to play on those teams, they have to be academically eligible. If they can’t understand science well enough to pass a class, they won’t be playing in any games.

A few students don’t know what they want to be when they grow up, which is totally fine. For those students, I tell them they should write something like “I don’t know what I want to be yet, but I do know I want to have many options when I graduate.” By doing well in science, they won’t be limiting their career options because they have a weak understanding of science concepts. If they don’t understand the science concepts in middle school, that will likely compound in high school. Those gaps of understanding will negatively affect their ability to succeed in required college science classes and get the degree needed for their career.  
 Student Goal Posters Freebie
Get the free posters here!

Whenever possible, explain the reasons why students are learning the material in your lessons. Link the lesson to their lives and future goals. Get the students in on it too by asking them how the material connects to them. Ever since I began doing this in my classes, I have noticed my students are more interested in lessons, ask better questions, have fewer behavior problems, and retain more of the information.

Beginning of Class Procedure and Routine


It is important to have a routine students can count on every day. Having the same procedures every day cuts down wasted learning time significantly. Here is the beginning of class routine I’ve used for the last three years in my seventh grade science classroom.  

During the passing period before every class, I stand outside of my classroom and greet all of my students. I’m happy to see them again! Just saying hello, having a short conversation, or noticing a new haircut helps me build and maintain a positive relationship with each student, something that’s very important to me. (If you need more ideas on how to build positive relationships with even the most difficult students read this blog post.) Greeting the students before class sets the tone for a positive learning environment.

The first thing the students see when they walk into my classroom is a whiteboard I keep propped right in front of the door so students cannot miss it. The board lists the beginning of class directions. For example, it might say
  • Hand in Hypothesis Worksheet 1 homework. 
  • Get your interactive notebook. 
  • Begin your Do Now.
Because I spent time early in the year establishing the beginning of class procedures, my students know they should be in their seats with their interactive notebooks by the time the bell rings. (Find information on setting up and organizing INBs here.) On the Promethean Board is a PowerPoint slide showing their Do Now. This is typically what the slide looks like:


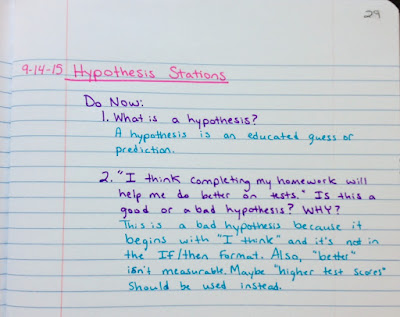
While I take roll call and take care of basic teacher housekeeping items, the students complete their Table of Contents and write the Do Now questions and answers in their INBs. I require students to write the questions in their INBs so they have potential test questions and answers to study in the future. Because the students need to work on their writing skills, they must answer the questions in complete sentences. The Do Now questions either review the previous lesson’s content or introduce the new content. To ensure students stay on task, I use a stopwatch to time their Do Now. Typically, I provide five minutes to complete the Do Now and add a minute or two if needed.  Here is a completed Do Now: 


When time is up, we discuss the answers together as a class. Students add to or change their answers as needed. Then we go over the day’s objective, rationale, and plan so students know what they are learning, why they are learning it, and how they’ll be learning it.

Well, that’s my beginning of class routine. It takes less than ten minutes, but it gets the class started without wasting learning time. The students’ minds get activated right away and ready to learn new content.

Thanks go to Desktop Learning Adventures and the ELA Buffet for setting up this blog hop. 


Analyzing Student Data with Stickers

One of the most important things I’ve learned about being an effective teacher is the importance of using student data in the classroom. Analyzing students’ results on assessments as a whole class tells me if I did an effective job teaching and what I need to work on in the future. When students look at their own results, they each see their areas of strength and areas of challenge. Analyzing data can be very time consuming and this can make it seem like it’s not worth it (especially when teachers have a mountain, or two mountains, of other things to do at any given time). In my own classroom, I’ve tried many different approaches, none of which I was particularly happy with. One day I was looking through my big box of stickers—I can never have enough stickers—and was inspired with an idea to use them to help students visualize their results. 

This method of data analysis all starts with how I organize the tests I use in my classroom. I always organize my tests by subtopics. For example, on a scientific method test I have headings like hypotheses, variables, and qualitative/quantitative observations. All of the questions pertaining to hypotheses will be found under that heading. This way, my students and I are able to quickly look at a section and see how well they understood it.

Take a look at my beginning/end of the year exam. You’ll notice the categories are all clearly laid out on the answer sheet. If you look at the picture of a page from the test, you’ll see the organization of the heading and questions. Having an organized test helps make data analysis much quicker.


After the students take the test and I grade their work, I dedicate about forty-five minutes of class time to analyze results with my students. This seems like a lot of time to look at data, but it gets the students motivated to do better. It shows them their growth and helps them reflect upon their study habits and become better future learners. It also shows the students who didn’t perform well on the test that they still have a good understanding in some areas (which helps prevent feeling like a failure, shutting down, and “not caring”). Also, during that forty-five minutes the students get needed practice with graphing and finding patterns in the results.

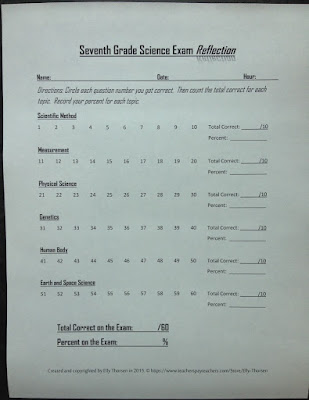
What do I do during that forty-five minutes? I start by having the students complete side one of a reflection sheet. (See the picture below.) Side one lists the topics covered in the test and shows each question number in each topic. For example, the Measurement questions on the test were numbers 11-20, so all of those numbers are listed under the Measurement heading.


Side one of the reflection sheet has students circle the question numbers they get correct and find the total number of questions correct for each topic. Then they calculate their percent correct on each topic. My students always need reminders of how to calculate percent, and I usually let them use the calculator on their phones for this.

Once side one of the reflection is completed, it’s time to determine best topics and most challenging topics. Side two of the reflection sheet helps with this. Side two has students consider their best and most challenging topics and try to determine the reasoning behind their success or misunderstanding.


Before class, I set up a poster or a group of papers with the test topics listed out. I sometimes divide each paper by class period or have separate posters for each class. Other times, I have all of the classes put their stickers on the same poster. 


Now it’s sticker time! I give all of the students two different colored stickers. You’ll need a lot of stickers for this so I buy some basic dot stickers to save money. This pack of 315 stickers costs about a dollar. I need two packs for my 200 students because I use only the blue and the red. Foil stars work well for this, too.


The blue stickers represent each individual student’s best topic. The red stickers represent his or her most challenging topic. Inevitably, I have students who have multiple best or worst topics. For those students, I tell them to select the topic that came easiest for them (for the blue sticker) or the topic that just never made sense to them (for the red sticker). The students who excelled on the test are still given a blue and a red sticker. The only exception I make to a student using both stickers is if the student feels very strongly that he or she had no challenging topic; then that student can just use a blue sticker on a favorite topic. Alternatively, you can have an additional topic on your poster that says “All” for students who aced the test. Students aren’t allowed to choose “All” for their red sticker because it feels too negative; there is always a topic that’s better than others.

After all of the stickers have been placed on the posters, we can quickly determine which topic is better than the others and which topic looks bloody. You can easily see on the posters below that the best topics are the Scientific Method and the Human Body. At a glance, you can tell the most challenging topics are measurement and either Genetics or Physical Science. 


We tally up the number of blue stickers and the number of red stickers for each topic. Then the students make a bar graph of the class’s results. We have a thorough discussion of possible reasons for the strengths of certain topics. (Potential reasons for success could be more time spent on that topic, a project or experiment that helped with understanding, or the level of interest students had.) We also discuss the likely reasons for the red topic. (Possible reasons could be difficult subject matter, more math involved, or many students being absent during that topic for weather or sports reasons.)


I like this method of data analysis because it is more student-centered. It’s not very time consuming for me. I don’t have to do much to analyze the data other than organize my tests a certain way and make some quick posters. Showing the results of tests using stickers makes it very easy for students to see their results and the results of the class. It gives them and me instant feedback that we can use to increase the understanding of content.

If you  have any questions about how to use this in your class, please comment below or send me a message using the Contact Me tab of my blog. My seventh grade science exam includes the reflection sheets seen on this blog and can be purchased at my Teachers Pay Teachers store. 

Secondary STEM Teachers

Teachers Pay Teachers has a huge amount of quality resources that can save you countless planning hours. When you look at the TPT site, sometimes is difficult to know where to begin.  If you're a secondary STEM teacher, start by checking out the stores below.

Giant Back to School Giveaway!

Hello everyone!

I've joined up with almost 100 other secondary sellers on Teachers Pay Teachers. We've put together several different packages you can win to prepare you for the 2015-2016 school year. These packages are huge! (Some packages are worth over $100!)

 Enter to win the giveaway!
Click here for more information and to enter to win.

Back to School SALE!

Hello everyone!

Teachers Pay Teachers is having a site-wide sale on Monday August 3rd and Tuesday August 4th. Everything in my store will be 20% off during these two days. If you use the promo-code "BTS15" at checkout you'll save even more money.

 BTS Sale

In my store you'll find many useful resources for the first week of school. I always give both a student survey and a parent/guardian survey in English and Spanish in the first couple of days of school. Another resource I use in the first week is the seventh grade science diagnostic exam so I get a good idea what my students already know and what they need to learn.

In the second week of school we start learning all about lab safety. This lab safety package can help you get your students ready for all of the fun experiments they'll do this year.

Make sure you check out the sale happening this Monday and Tuesday!

Everything in My Store Is on Sale on the 15th!

Hello everyone! It's an exciting week here in Korea: I had a freebie featured in the Teachers Pay Teachers newsletter today, it's my birthday in a couple of days, and there is a typhoon outside. smile emoticon Anyway, I've decided to have a sale on Wednesday, July 15th. Everything in my store will be 20% off. Make sure to check it out!

My Teachers Pay Teachers Store

What to Do in the First Week of School

In July, I always start thinking about the upcoming school year. Front and center on my mind is the first week of school. What should we do to start the year off right?  I know it is super important to talk about rules and consequences during the first week. I also have to discuss the syllabus (boring but important). I want to get to know the students, and I want them to get to know me. So that I am able to give the students what they need during the school year, learning what they already know about science is important, too.

Here is what I typically do with my seventh grade science students during the first week of school.  

Day 1:

I start the year by greeting all of my students as they come into the classroom. It’s always fun to meet the new students.  Usually they are uncharacteristically shy on day one.  Enjoy it while it lasts. J Just kidding. It’s fun when they start to show their personalities.

In my class, students have alphabetically assigned seats right away. I tell the students they have assigned seats so I can learn their names as quickly as possible. However, learning their names is only one of the reasons I give a seating chart right away. The students are usually vocal about who they want to sit with, which gives me an idea of the social connections students came in with and how different students work with each other. In addition, I don’t want them to get the idea they can choose their seats in my classroom.

Once the students are seated, we go over the syllabus together. I ask them questions about whether or not they’ve learned certain science topics before so I can start thinking about the time I’ll dedicate to each topic during the year. We also talk about the supplies they’ll need for my class. I only require the students to have a composition notebook and a pencil or pen. (We do everything in our interactive notebooks. Learn how to set up interactive notebooks here.) I make sure the students know they need their composition books by Monday of next week, and then I remind them of this every day for the rest of the first week.

After all the boring stuff is out of the way, we’re ready for something a little more interesting. This is when I give the students their first “quiz.” It’s fun to watch the students moan and groan about having a quiz on the first day of school. However, the quiz is easy and the students aren’t expected to know any of the answers. What’s the quiz about? It’s about their teacher. It is usually just a ten question multiple-choice quiz about who I am as a person. I try to choose questions most students want to know (“How old is Mrs. Thorsen?”),  have a short story behind them (“How many times has Mrs. Thorsen chipped her teeth?”), or show common interests (“What’s Mrs. Thorsen’s favorite video game?”). Once the students finish their quizzes, we go through the questions one at a time and we talk about the answers together. I like to have the students raise their hands to show which answer choice they chose.  I usually give a small prize to the student or students who got the highest score.

The last thing we do on the first day of school is ask get-to-know you questions. All of the students have to either ask me a question about myself or let me ask them a question about themselves. We take turns asking questions and listening to each other’s answers. It’s always interesting to hear what questions they have for me, and I can learn a lot of neat things about my students this way.

Before the students leave, I give them their first homework assignment: a Parent and Guardian Survey. All the students need to do is give it to a parent or guardian to complete and bring it back later in the week. Learn more about the benefits of using a Parent and Guardian Survey here.

Day 2:  

Day two is all about rules. This can be boring, so I try to liven it up a little bit. I thoroughly discuss each classroom rule and have the students help me by providing examples of following the rules correctly and breaking the rules. Once I think the students have a good understanding of the rules, I divide the class into six groups. I give each group a paper with a rule on it and the word “break” or “follow.” 


The groups then have to make a short skit acting out a class or student breaking that rule or following that rule. The skits are usually very humorous, especially the ones breaking a rule.

After the skits, we talk about what happens when students break rules. I go over each consequence and how they work in the classroom. I make sure the students understand exactly what happens if they choose to break the rules. It is so important for students to understand the rules and consequences perfectly so there are no unpleasant surprises for them or you later in the school year.


Day 3:

I start class with a brief review of the rules and consequences we talked about on day two. Then the students complete a Student Survey. (See my English and Spanish Student Surveys here.) I let the students talk to their classmates while they work on the surveys. When the students are done with their surveys, we share some of our answers together to build positive connections with one another. I have the students turn in their surveys. The surveys help me remember the students’ names. I keep the surveys in a binder for the rest of the year and refer back to them whenever I need a little help reaching any difficult students.

For the rest of the class, I give all of the students a notecard and let them decorate it. They can decorate the notecard in any way they want. I only require that they have their names on it and either use pictures or words to show who they are as a person. Some students draw pictures of their favorite sports. Other students make a list of their favorite bands. Many students like to cut out pictures or words from magazines and glue them onto their notecards. The homework that night is to finish the notecard.


During the year, I put several notecards on the wall at a time and rotate them out each week. The students love looking at them and trying to find their own and their friends’ cards. I think it’s a good way to help create a positive classroom environment and a place students want to be and feel a part of.

Day 4:

Day four is an exam day. Students don’t like this part, but once you explain the importance of it they’re much more accepting.  In the first week of school, I always give a comprehensive exam of everything we’ll be learning that year in 7th grade science. The exam helps me and the students see what they currently understand and what we’ll need to work on during the school year. It also gives us a chance to practice the class test taking expectations. Because the test is rather large, it can take more than one class period (unless you have block scheduling) for some students to finish.

Day 5:

I usually give ten to fifteen minutes for students to finish their exams from the day before. Then we grade the exams together. I tell the students it is perfectly okay if they get a terrible score. The exam is just to show us what we need to do this year. It does not go in the gradebook (that’d be soooo unfair). After we grade the exams together, they complete a reflection sheet to help them analyze their results and I collect all of the tests and reflection sheets. At the end of the entire school year, the students take the same test again (this time for a grade) and complete another reflection sheet. This exam really shows the progress they make over the year.


Well, that’s our first week of school. I hope sharing this gave you a few ideas to use in your own classrooms. Please let me know if you have any questions by commenting below or sending me a message using the Contact Me page on my blog. Have a great first week and an even better year!

Are you a middle school science teacher? Sign up for my newsletter! You'll get a free science resource just for joining.

Why You Should Use a Parent and Guardian Survey in Your Secondary Classroom

The first homework assignment I give my middle school students every year is a parent and guardian survey. It is the easiest homework assignment the students have all year, because all they need to do is get someone at home to fill out the form and then bring it back to school later in the week. Little do they know, this form provides invaluable information to me as a teacher.  I refer back to the surveys throughout the entire year.

I’m not sure if your district is like mine, but year after year I’ve found the contact information teachers have access to is outdated. I recall my frustration at trying to contact parents using every number listed on PowerSchool only to find all of them were wrong numbers, numbers that didn’t exist, or disconnected numbers. This was hardly a rare occurrence—what was a rare occurrence was when I was actually able to reach a parent. The inability to contact parents was what initially caused me to create and use a parent and guardian survey.

The survey I made has space for the contact information of two parents or guardians. The best times and methods of reaching each person are also listed. Giving these surveys at the beginning of the year ensured I had the most current phone numbers and email addresses. Once I began using the surveys, I rarely had trouble contacting home.

My Parent and Guardian Survey that I
give at the beginning of the year
Since making the survey several years ago, I’ve improved it by adding and tweaking questions that aid me in helping my students. In addition to the basic contact information, I also ask parents and guardians a variety of questions about their children. Their answers help me give the students what they need to be successful.  A student might need help reading, practice speaking in front of others, or extra math assistance—all of which are helpful to know going into the school year.

I’ll know of any potential obstacles to getting homework completed because I’ll learn things like what activities the students are involved in, what kind of homework help is available, the different languages spoken at home, and whether or not students have Internet access. This information helps me determine what kind of projects I assign in my classroom and what parts of those assignments students will be capable of completing at home.

Through using these surveys, I’ve learned important information I wouldn’t otherwise be aware of. I’ve learned of students’ allergies (something especially important for a science classroom that often conducts experiments with a variety of materials).  Hearing or vision issues have also come up; knowing about these helped me make effective seating charts. Some of my students had recent deaths in the family or were in foster care. Just knowing about what my students were going through allowed me to change my lessons or approach certain situations differently. (Genetics can be a sad topic for students who have never met their biological families, so a family tree project isn’t the best choice.)

The parent volunteer section on my Parent and Guardian Survey
Another part of the survey gives parents and guardians opportunities to help the students and the classroom. Many parents and guardians are more than willing to help; they just don’t know what is needed. Thanks to this survey, I learned who wanted to help and what they were willing to do. Many people helped enormously in my classroom by translating information, tutoring students for tests, and donating supplies.

It is important to know about our students so we can do our best to help them. A positive connection with parents and guardians can do wonders in helping students in the classroom. These surveys begin building home connections and allow teachers to reach out for whatever reason during the school year.  

If you don’t currently use a parent and guardian survey in your classroom, I strongly suggest implementing one this year. The Parent and Guardian Survey I made and use in my classroom is available in both English and Spanish. Click here for more information. 

 Parent and Guardian Survey
Click on the picture to get my Parent and Guardian Survey.

Are you a middle school science teacher? Sign up for my newsletter! You'll get a free science resource just for joining.

How to Set Up an Interactive Notebook in Any Classroom

Interactive notebooks are useful in any subject area. In my science classroom, students used them for all of their Do Nows, all of their notes, and many daily assignments. Every day, the students knew they had to get their interactive notebook, fill in the Table of Contents, copy the Do Now questions, and answer the Do Now in sentences. When we went over the Do Now answers, the students would sometimes add to or change their answers so they had accurate information. Then, if we took notes that class period, the students knew exactly where to write them. They would add any vocabulary words to their glossaries. When it came time to study for a test, the students had potential test questions and answers from all the Do Nows and they had all of their notes organized neatly so they could find information quickly.

During the school year, I kept an interactive notebook as well. When a student was absent, I could show them my interactive notebook or make a copy of certain pages to distribute. Interactive notebooks have proven invaluable to me as a teacher. They show everything we learned, when we learned it, and how we learned it. That makes lesson planning so much faster and easier the next year. I love interactive notebooks and would never go back to not using them in my classroom.

Interactive notebooks are adaptable and can suit the needs of each classroom and subject area. There are different ways to set up interactive notebooks. Below you will find directions, pictures, and advice on how to set up a basic interactive notebook for your classroom. Here is a how-to guide in English and Spanish you can provide for your students.

First, instruct your students to purchase a composition notebook. Composition notebooks were the only required supply for my classroom and should cost less than two dollars. I strongly recommend composition notebooks over any other kind of notebook. Composition notebooks are durable and, in my experience, can even hold up to a year of abuse from middle school students. All other notebooks tend to fall apart quickly. Plus, students are tempted to tear out notebook pages to use for other purposes.


I always set up interactive notebooks on the first day of the second week of school. That way students have plenty of time, including a weekend, to go out and buy one. I encourage students to bring in their composition books early and keep them in my classroom so they are less likely to be forgotten on the day we need them. Inevitably, you will have some students who will not bring a composition book on time. For those students you have two options. One, have a stockpile of composition books for students to purchase from you. (Office Depot usually has a back to school sale where you can buy loads of composition books for only a quarter each.) Two, have students write detailed notes on how to set up their composition books so they can do it at home on their own.

Setting up interactive notebooks takes longer than you might expect. I always dedicated at least a full hour of class time to getting them done. Even then, I sometimes had a few students not quite finished in the allotted time. On the day you plan to set up interactive notebooks, make sure you have a completed example (or use the pictures from this blog post) for students to reference. Start by having students number the pages in their interactive notebook. Have them number the outer, upper corner of every page, so if you were to flip through the pages quickly with your thumb you would see every page number. Refer to the picture below.


Numbering the pages takes between ten and fifteen minutes, so while the students are numbering, pass around a few permanent markers. With the markers, students need to write their first and last names, class name, class period, year, and grade on the cover.


Also, with the permanent markers, students should write their first and last names along each side of the composition book. This will help students find their interactive notebooks much faster at the start of class. (The students in my classes were not allowed to take their interactive notebooks out of the classroom. Without this rule, you can expect many interactive notebooks to never make it back to class. I did make the occasional exception to this rule for responsible students who requested to take their interactive notebooks home to study.)


I haven’t tried this with a class before, but consider adding a color-coded system to quickly separate interactive notebooks by class period. You might try a certain color of sticker for each class period. Students can add a sticker of their class’s color to the upper right hand corner of their interactive notebooks.

Once students have finished numbering the pages and labeling the outside of their interactive notebooks, they are ready to create the table of contents. Use the front and back of the first five sheets (pages 1-10). Students should make three columns: a column for the date, title, and page number of each entry. If students use rulers to do this, expect it to take 10-15 minutes. See the pictures below for how the table of contents should look.


Below you’ll find a picture of a completed table of contents.


Now the students are ready to make their glossaries. Some teachers require students to write the vocabulary words and their definitions. If this is something you want to do, have no more than two letters per page. I only required students to write the vocabulary words and page numbers in their glossaries. To label the glossary like I did in my classes, have students use the last three sheets of paper in their lab books. Label the top of each page “Glossary.” Then divide the page into four even boxes. Write one letter in the corner of each box. See the pictures below.


When you get to the last page of the glossary, put U, V, and W in their own boxes. X, Y, and Z, since they have so few vocabulary words, will share a box. See the image below.


If during the year the students run out of room in their glossaries, simply put a sticky note over the top of the box.  My students never had enough room in the C box, as you can see in the picture below.


Once the students are finished making their glossaries, they are done! The interactive notebooks are now set up and ready to use. You can get a how-to guide with step-by-step instructions and pictures for your students to make creating their interactive notebooks even easier.

Like I mentioned earlier, I did not let the interactive notebooks leave my classroom. If you implement this rule too, you’ll need to have some sort of storage system in place. I liked using plastic milk crates because they were inexpensive, sized perfectly, and kept the interactive notebooks neatly organized. I bought six crates and then labeled them alphabetically, with several letters for each crate. The students placed their interactive notebooks in the crates by last name.

The first year I used interactive notebooks, I had the crates divided by class period rather than alphabetically. I do not recommend this. I had close to forty students in each of my classes and it took FOREVER for all of the students to locate their interactive notebooks when they were all crowded around the same crate.

As far as grading the interactive notebooks, I graded them once each quarter. I have tried many grading methods over the years, and I finally have one that works for me. My interactive notebook grading check comes in three versions (all versions are in both English AND Spanish), and it's FREE.


Middle school science teachers: I have tons of science interactive notebook pages you and your students will love. My interactive notebook pages are unique because they are heavy on content and fun practice while not involving tons of time-consuming cutting, folding, and gluing. Check them out!

Teacher Appreciation Sale

 Elly Thorsen's TPT Sale

Happy Teacher Appreciation Week! As a way to thank teachers, Teachers Pay Teachers is having a site-wide sale from May 5th-6th.  Most stores on TPT, mine included, will have all resources marked down 20%.  If you use the coupon code "ThankYou" during checkout you'll get even more of a discount. I hope you're able to get some great resources at great prices during this sale! Take at look at the many discounted resources in my store.

My newest bundled package has four organ system exit tickets. It is worth four dollars but with my sale and the TPT coupon code, you can get it for only $2.16.  Get the Human Body Organ Systems Exit Ticket Package now and save money.

 Organ System Exit Ticket Package


Science Lab Safety Package: SALE

Hello everyone! I just finished completely revamping all of my middle school lab safety resources. The PowerPoint has a new look and now comes with a student notes sheet, a teacher notes sheet, and a modified student notes sheet for SPED students. The questions on the quiz did not change but the quiz overall has a slightly new style.  The rules and scenarios activity has a new look as well.

These resources come in a thirty-two page package worth $8.50, but for the next few days they will be on sale for ONLY $3.50. Get them now and be prepared for your first science unit in the fall!

Get the Science Lab Safety Package here.

 Safety Package

What's Growin' in My Classroom: April 2015 Secondary Smorgasbord

Do you use card sorts in your science classroom? I like using them with my middle school students. Card sorts can be used in a variety of ways. They are a great way to see what students know going into a new unit. They can be used to practice new concepts. Or they can be used to review material your students haven't worked with for awhile. 

 Physical and Chemical Changes Card Sorting Activity
My seventh grade science students always enjoyed card sorts, and we especially used card sorts during our physical science unit. We brought out card sorting activities for elements, compounds, and mixtures; homogeneous and heterogeneous mixtures; the changes in states of matter; and physical and chemical changes. 

My students liked card sorts because they could work together with classmates while they classified the cards. It felt like a game. I liked the card sorts because they allowed me to meet the needs of all the students in my class. The card sort was great for my many ELL students because each card had both words and pictures. The kinesthetic learners benefited as well because they could move and arrange the cards.  The advanced students could provide rationale for each of their classifications or create their own examples to add to the card sort. Students who needed more practice with the content could work with partners who could explain the material while sorting the cards.

 Physical and Chemical Changes Card Sorting Activity
Another thing I liked about using card sorts in my classroom was the versatility. The activity could take as little as five minutes by having students quickly sort the cards and checking their answers. Or the activity could last up to forty-five minutes, which allowed for students to record their answers, explain and defend their classification choices, and answer reflection questions. It was also flexible because it could be used as a unit introduction, a way to practice new material, a quick check of understanding, or a review. The activity could easily turn into a fun class competition by seeing which group correctly sorted the cards the quickest.

Take a look at the many different card sorts I have used with my seventh grade science students.

Thank you ELA Buffet and  Desktop Learning Adventures for arranging and including me in this Smorgasbord!


Learning Regular and Irregular Verbs

About two months ago I began teaching English to all ages of students in Korea. Something I've noticed my Korean students are having trouble learning is the past tense of verbs. Regular verbs, like "play," are easy for most of my students because simply adding -ed changes the verbs to past tense. Once my students understood that, regular verbs became easy for them. However, irregular verbs are more difficult.

 Past Tense Worksheets with Regular and Irregular VerbsThe past tense of irregular verbs can be tricky because there is no addition of -ed; the irregular verb changes. For example, "run" changes to "ran" and not "runned."  Learning irregular verbs seems to be a matter of memorization. Because of this, my students need plenty of practice and repetition. To help them, I created three different worksheets. The first worksheet focuses on regular verbs only, and the second worksheet only gives practice with irregular verbs. The third worksheet is a combination of regular and irregular verbs. All worksheets have two parts and a total of fifteen questions. In the first part the students change verbs from present to past tense. In the second part the students change present tense sentences to past tense sentences.

The first worksheet, Past Tense: Regular Verbs, my students breezed through with little assistance. They needed a lot more help with the second worksheet. I started class by writing some examples of irregular verbs on the board. Sometimes the students knew the past tense form or were able to guess. Other times they needed to be told the past tense form. We did most of the second worksheet together in class.

Before the final worksheet, Past Tense: Regular and Irregular Verbs, I made a chart on the board with student given examples of verbs. I had the students then identify the regular and irregular verbs. We made present tense sentences with each of the verbs and then changed those sentences to past tense. The sentences we made together were simple so we were able to better focus on the verb changes. "They play in the park." turned into "They played in the park." After this practice, the students completed most of the worksheet on their own.

 Past Tense Worksheets with Regular and Irregular Verbs

Since my students still need practice memorizing the past tense of many irregular verbs, I'll have them make flashcards to practice with. I also might try a card game like Concentration. Or I might have the students sit in a circle and have one student give a verb and the next student say the verb and give its past tense. Going around the circle, each student would repeat what the previous student said and then add a new verb.

Find the worksheets I created for my classroom by clicking here.

Past Tense Worksheets with Regular and Irregular Verbs

Teaching English in Korea: My New Students

It’s been a while since I last posted. What’s kept me away?  In February I started a new teaching job. Now I teach English to all ages of Korean students at an English Education Center in Pyeongtaek, Korea. I work with kindergarten all the way up to adults. I’ve gotten into the swing of things and have more time to blog again. This new teaching position is quite different from my previous one, where I taught seventh grade science in Oklahoma.

When I was back in Oklahoma my class sizes were upwards of thirty. Now, my biggest class is 12 students. It’s been a very nice change. The smaller class sizes allow me to get to know my students better, something I was missing when I had the enormous amount of students I did in OK. However, it is way more difficult to get to know my students because most of them speak very limited English. I think it’s difficult for us to relate to each other as well, since we have such vastly different backgrounds. I’m working on coming up with things we have in common with each other. So far food, recreational activities, and the occasional movie have created some fun partial conversations.

Most of my new students came into my classroom with English names. I have no idea what their real names are and that’s strange to me. Do you know what happens if students come into your classroom without English names? The teacher gets to name them. Their English name will stick with them for the rest of their English education, which can be well into adulthood. Some of the names the students receive are amusing, though that may or may not be a good thing. For example, there is a little boy named Honey and an adult named Obama. Some are named after superheroes. I guess as long as they’re happy with their names, right? I’ve named two adults and around half a dozen kindergarteners. Whenever I think I might have a new student who needs a name, I try to have some in the back of my mind because it can be challenging to come up with an acceptable name on the spot. I was going to name my adult class Downton Abbey character names, but unfortunately only one student in that class needed a name. I named her Daisy, and she was pretty happy to have the name of a flower.

I miss working with seventh grade students. That was one of my favorite parts about teaching in Oklahoma; I got to work with my favorite age of students every day. Now my students are kindergarten through six grade plus two classes of adults. Surprisingly, my favorite classes to teach are my adult classes. The first day I was so nervous. The class had started late because the teacher using the room before me finished her class after the bell. I came into the room and began to set up quickly. I casually said “hello” to the class and was shocked when every one of the adults said, in unison, “hello” back to me. It was such a surprise that it made me laugh aloud and ever since then I’ve enjoyed every class with them. Also, it is a wonderful change to be thanked by all of your students after you teach a class.

The youngest grades are…interesting for me. I’m doing just fine teaching them, but they drive me a bit crazy. I’m not a natural at connecting with that age level. In addition, there is an extra level of difficulty because they know the least amount of English.  The first day I taught my kindergarteners, I spent an entire ten minutes trying to get them to pack their bags and line up at the door so they could go to their next class. Eventually, they were so late their next teacher came to my room to get them. She’s a Korean teacher so within moments she got them packed up and herded into her room.  They’ve improved dramatically since then, but there’s been plenty of humorous minor problems that’ve popped up.  I think I should create a series of blog posts entitled “Teaching Kindergarteners Who Speak Only Korean When You’re Actually a Middle School Teacher Who Only Speaks English.” It’d be quite comical.


Well, that’s all I have time for now. I’ll try to write another post soon. Let me know if there is anything in particular you’d like to know about the differences between teaching in the US versus Korea. 

Memorable Teachers and How They Made Me a Better Educator: Part Five

I am lucky to have had five teachers who made a powerful and positive impression in my life and, looking back, I realize they greatly influenced the kind of teacher I am today. For this five part series, I will talk about why the teachers were important to me and how I use what I learned from them in my own classroom.

Part Five: The School of Life with My Brother Jeb

Hands down, the most influential person in my life was my older brother Jeb. One of my fondest memories is when he brought his yellow VW bug to school to share with my science class when I was in 8th grade. You see, he had tricked out his car so it had an impressive (and loud) car audio system and had won multiple competitions. He knew all about sound and shared some of what he knew with my classmates (while blaring Insane Clown Posse in the background).

When I was really little I used to sneak over to my brother’s room after our parents had given us lights out and we’d pretend like his bed was a tank and we were destroying bad guys.  Jeb used to take me to his friends’ houses, even though I was six years younger than him, to play Dungeons and Dragons. When I was in middle school and high school he’d bring me to his apartment to play video games, especially Halo. He made sure I knew I could talk to him about anything and he valued my opinion and thoughts. Between my sophomore and junior years of high school, he was diagnosed with cancer and nine months later he died. During his entire sickness he modeled strength and positivity.  His absence continued to shape me into who I am today.

Jeb’s life and death taught me how to be strong and how to empathize with others. As a teacher, he helped me relate to and support my most difficult students. I understand their pain and am therefore better equipped to relate to them and give them what they need. He made me want to be a role model for others, just like he was a role model to me. I want to make my students feel valued just as Jeb made me feel like I was important. And it’s pretty nice to see students’ jaws drop when I know more about Halo and ICP than they do.


Take a look at the other teachers who are a part of this series.
Part One: Elementary School
Part Two: Middle School
Part Three: High School
Part Four: Graduate School